
Description
The Premise
After acquiring a 3rd 3D printer, I found a need to reduce the footprint that 3D printers were taking up in regards to worktop space. The Wanhao i3 V2 I own is both quite an old/outdated printer and takes up a considerable amount of space due to its seperate control box.
The printer had been upgraded throughout my time owning it to add mesh bed levelling and a better control board and so while the frame lacked rigidity (even after adding a Z axis brace) and print times were slow for accurate parts most of the core hardware was still usable and so a design was constructed to use as much of the old printer as possible while updating it to a more modern setup. Initial designs involved simply taking advantage of the relatively large cavity under the Y-carraige and calling it a day but after further consideration this would involve redesigning the bottom section of the frame and wouldn't solve the problem of chassis ridigidity or print speed regardless. The requirements therefore, for a new design were as follows:
- Use as many parts from the Wanhao as possible
- Move the mainboard and display from a seperate control box to the printer chassis to reduce the footprint
- Move over to a core XY layout to increase print acceleration and speeds
The Design
While the plan was to use as many parts as possible the decision was made to scrap the original hot end due to MK10 nozzles, heatbreaks and blocks becoming harder to come by without importing from China. Meanwhile the titan extruder format is relatively cheap now and while ideally I'd have run the titan aero for less travel between the extruder and nozzle the additional clearance with the volcano hot end was necessary for initial designs.
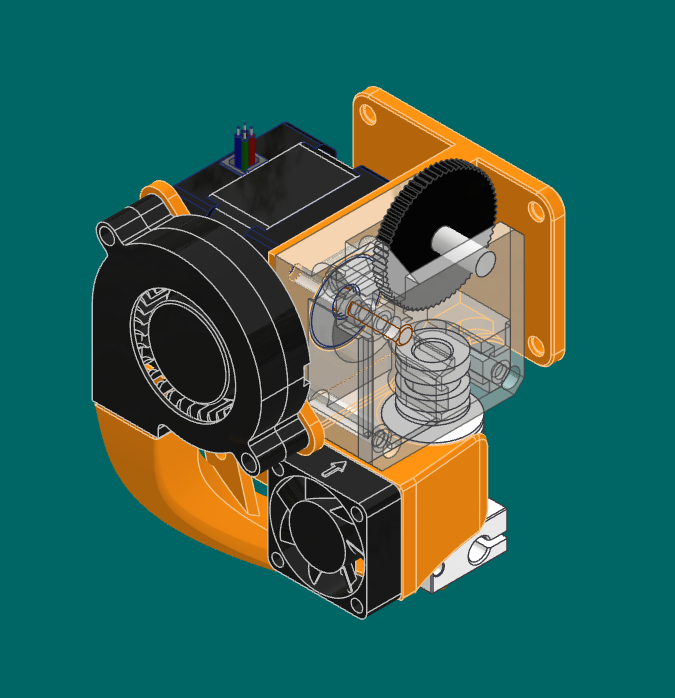
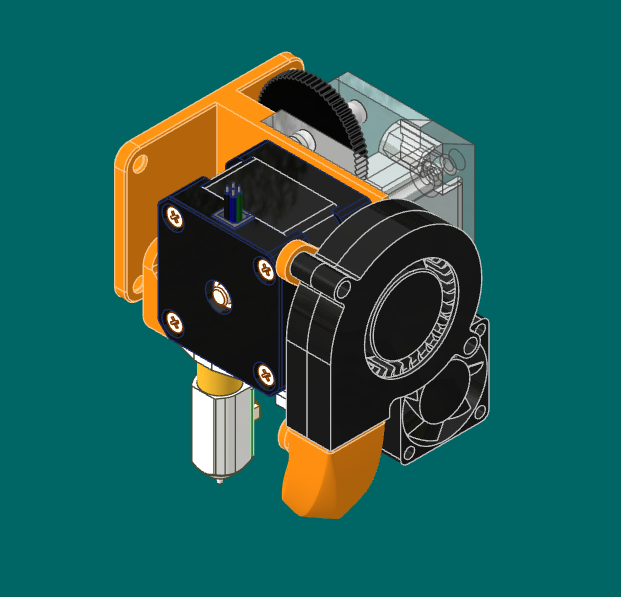
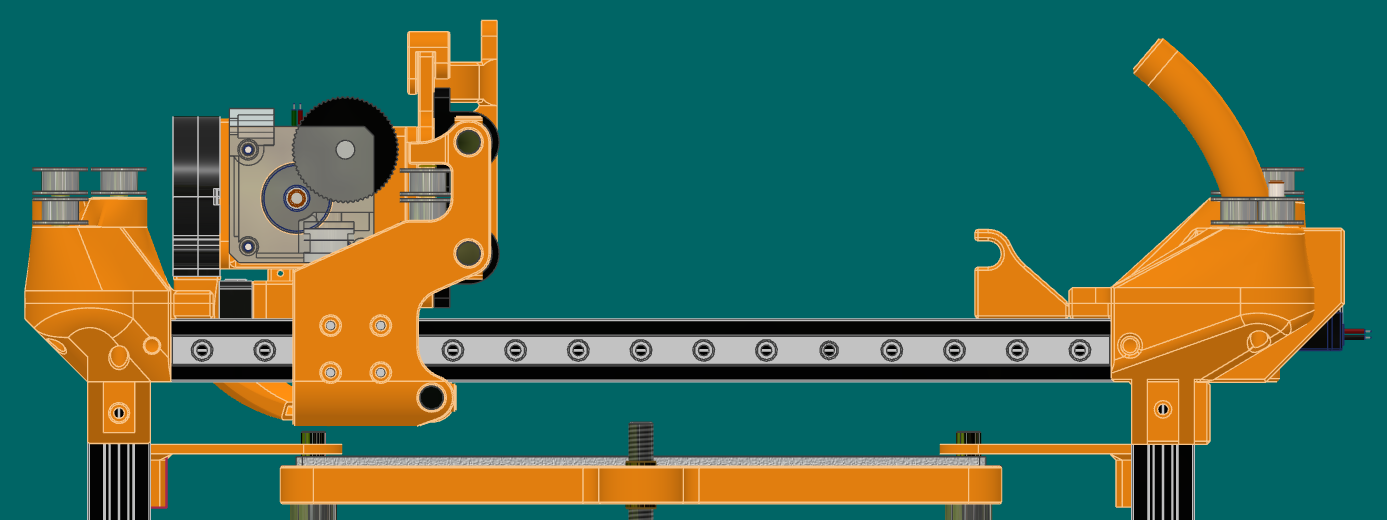
The other design decision made straying from using original parts was the Y-Axis. While initial designs used 8mm rod and linear bearings the amount of play in the axis under belt tension caused binding, so a switch to linear bearings was made.
Firmware wise the switch to Klipper was made with the use of a Raspberry Pi Zero 2W. This allowed for resonance compensation using an accelerometer mounted to the extruder and a webcam to be installed to monitor prints when not in the workshop.
The Problems
Just like with any initial design this printer isn't without it's teething problems. Due to reusing the X-carraige rods from the original printer, the rods do not go through the entirety of the Y-carraige mounts. This leads to some rotation in the mounts when the core XY belts become under tension. That being said while the current core XY layout is functional I am not entirely content with it. The belts going across the front of the printer is clunky in my opinion and the current mounts for the pulley system bulge outside of the printer chassis which is unappealing design wise. I'm considerign upgrading the X axis to a section on T-Slot over 3x8mm rods for additional rigidity and simplicity. This would also allow for use of a V-Pulley or linear rail setup for the X-axis which would increase print quality. While the current extruder is functional, the package is no lighter than the old MK10 extruder and could do with some redesign. I'm considering moving over to an orbital extruder and pancake stepper motor which would decrease the weight of the extruder and allow for higher accelerations to be run. Finally the spool holder and filament feeding system has never been perfect and has been most problematic. Currently printing matte filaments causes too much friction in the bowden tubing feeding the printer. I'd like to redesign the spooling process so that the filament is fed around a set of 1mm U-pulleys as bowden tubing is unneccesary in a direct drive setup.
Further Development
With all of the current teething problems considered here's the current development path:
- Redesign the core XY belt layout to a voron style implementation over the system used in machines such as the ANT PCB mill
- Replace the X-axis rail setup with T-Slot or linear rail
- Redesign the extruder to use a lightweight orbital + pancake stepper extruder
- Redesign the spooling system to reduce extruder torque required
- Implement a heated chamber to print ASA